


Specification
Delivery Guidlines
Delivery Guidlines
Delivery Information (UK Mainland Only)
- Orders placed before 2PM are dispatched the same working day where possible. Most items are held ex-stock; if an item needs to be ordered, any delays will be notified.
- Named Day Delivery (Monday–Friday) is available—please add your preferred delivery day in the Notes / Instructions box at checkout. Saturday, AM, and timed deliveries are available on request (£POA).
- All orders are shipped via a tracked carrier. Orders dispatched on a Friday will be delivered on Monday.
- Specials and made-to-measure kits have longer lead times. We recommend not booking installation until goods have been received, as courier delays can occasionally occur.
Installation Guidlines
Installation Guidlines
How to Fit Maxi Wall Panels
Step 1: Prepare the Workspace
Clear the area, protect the floor, gather tools, and ensure the wall is clean, dry, and smooth.
Check for defects or protrusions and fix them before installation.
Step 2: Measure & Cut Panels
Measure wall dimensions carefully, including spaces around sockets and switches.
Cut panels accurately and double-check measurements before cutting.
Step 3: Dry Fit Panels
Position panels on the wall without adhesive to check layout and appearance.
Ensure panels are level, aligned, and fitted snugly with no gaps.
Step 4: Apply Adhesive
Follow the manufacturer’s instructions for adhesive application.
Spread adhesive evenly across the back of each panel for a strong bond.
Step 5: Fix Panels to the Wall
Press panels firmly into place, ensuring correct alignment with a level.
Use temporary supports if required while the adhesive sets.
Step 6: Secure the Panels
Reinforce panels with finishing nails or screws if recommended.
Countersink fixings to achieve a neat, professional finish.
Step 7: Finishing Touches
Fill gaps or seams with matching caulk for a seamless look.
Remove excess adhesive with a damp cloth before it dries.
Step 8: Cleaning & Maintenance
Clean panels according to manufacturer guidelines, usually with a damp cloth.
Maintain regularly to preserve appearance and longevity.
Step 9: Enjoy Your New Space
Reposition furniture and style the room to suit your space.
Enjoy the refreshed, modern look created by your wall panels.
Price Match Promise
Price Match Promise
Our Price Match Promise ensures you get the best value.
View the full guidelines and eligibility details here.
Why Choose Showerboard
Why Choose Showerboard
Discover why Showerboard is a smart choice for modern bathrooms.
Click here to learn more about its benefits and features.
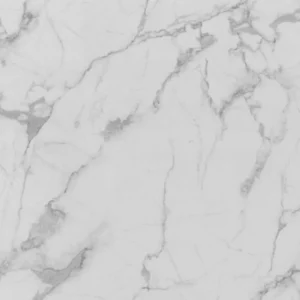
Decorwall Maxi PVC Wall Panel Gloss Bianco Gold
£70.00 Original price was: £70.00.£50.00Current price is: £50.00.
Usually deliver in 3 to 7 working days
Description
Decorwall Maxi PVC Wall Panel – Gloss Bianco Gold
The Decorwall Maxi PVC Wall Panel in Gloss Bianco Gold combines elegance and practicality, making it perfect for bathrooms, wet rooms, or shower enclosures. Designed to fit the two most common shower tray widths, these high-quality panels are 100% waterproof, ensuring safe and reliable use in any wet area. The smooth, non-porous surface requires no grouting, reducing the risk of mould and making cleaning quick and effortless. Installation is simple with just a few common household tools, and suited trims provide a seamless, professional finish. Durable, low-maintenance, and stylish, these panels come with a 5-year guarantee, offering peace of mind while enhancing your space.
Specification
Delivery Guidlines
Delivery Guidlines
Delivery Information (UK Mainland Only)
- Orders placed before 2PM are dispatched the same working day where possible. Most items are held ex-stock; if an item needs to be ordered, any delays will be notified.
- Named Day Delivery (Monday–Friday) is available—please add your preferred delivery day in the Notes / Instructions box at checkout. Saturday, AM, and timed deliveries are available on request (£POA).
- All orders are shipped via a tracked carrier. Orders dispatched on a Friday will be delivered on Monday.
- Specials and made-to-measure kits have longer lead times. We recommend not booking installation until goods have been received, as courier delays can occasionally occur.
Installation Guidlines
Installation Guidlines
How to Fit Maxi Wall Panels
Step 1: Prepare the Workspace
Clear the area, protect the floor, gather tools, and ensure the wall is clean, dry, and smooth.
Check for defects or protrusions and fix them before installation.
Step 2: Measure & Cut Panels
Measure wall dimensions carefully, including spaces around sockets and switches.
Cut panels accurately and double-check measurements before cutting.
Step 3: Dry Fit Panels
Position panels on the wall without adhesive to check layout and appearance.
Ensure panels are level, aligned, and fitted snugly with no gaps.
Step 4: Apply Adhesive
Follow the manufacturer’s instructions for adhesive application.
Spread adhesive evenly across the back of each panel for a strong bond.
Step 5: Fix Panels to the Wall
Press panels firmly into place, ensuring correct alignment with a level.
Use temporary supports if required while the adhesive sets.
Step 6: Secure the Panels
Reinforce panels with finishing nails or screws if recommended.
Countersink fixings to achieve a neat, professional finish.
Step 7: Finishing Touches
Fill gaps or seams with matching caulk for a seamless look.
Remove excess adhesive with a damp cloth before it dries.
Step 8: Cleaning & Maintenance
Clean panels according to manufacturer guidelines, usually with a damp cloth.
Maintain regularly to preserve appearance and longevity.
Step 9: Enjoy Your New Space
Reposition furniture and style the room to suit your space.
Enjoy the refreshed, modern look created by your wall panels.
Price Match Promise
Price Match Promise
Our Price Match Promise ensures you get the best value.
View the full guidelines and eligibility details here.
Why Choose Showerboard
Why Choose Showerboard
Discover why Showerboard is a smart choice for modern bathrooms.
Click here to learn more about its benefits and features.
You might also need
Related products
- Maxi Collection
Decorwall Maxi PVC Wall Panel Matt Pewter Stone
£70.00Original price was: £70.00.£50.00Current price is: £50.00. - Maxi Collection
Decorwall Maxi PVC Wall Panel Matt White Stone
£70.00Original price was: £70.00.£50.00Current price is: £50.00. - Maxi Collection
Decorwall Maxi PVC Wall Panel Matt Metallic Stone
£70.00Original price was: £70.00.£50.00Current price is: £50.00. - Maxi Collection
Decorwall Maxi PVC Wall Panel Gloss Bianco White
£70.00Original price was: £70.00.£50.00Current price is: £50.00. - Maxi Collection
Decorwall Maxi PVC Wall Panel Gloss Fusion Light Grey
£70.00Original price was: £70.00.£50.00Current price is: £50.00.